A Step-by-Step Guide to Applying an Excavator Parts Diagram
Utilizing an excavator parts diagram effectively can enhance maintenance, troubleshooting, and overall operational efficiency. Here’s a comprehensive step-by-step guide on how to apply an excavator parts diagram in practical scenarios.
Step 1: Obtain the Correct Diagram
- Identify the Model: **A Step-by-Step Guide
- Ensure you have the parts to Applying an Excavator Parts Diagram**
Using an excavator parts diagram effectively can significantly enhance maintenance, troubleshooting, and operational efficiency. Here’s diagram specific to your excavator model (e.g., Caterpillar, a detailed step-by Komatsu).
- Access Resources:
- Obtain diagrams from service manuals, manufacturer websites, or industry publications.
Step 2: Familiarize Yourself with the Diagram
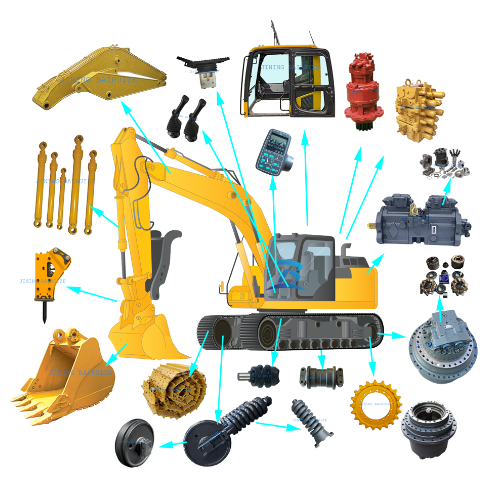
- Study Component Layout:
- Review the diagram to-step guide understand the layout of all major components, on how such as the cab, boom, stick to apply an excavator parts diagram in practical settings.
Step, bucket 1: Obtain the Correct Diagram
, and undercarriage.
- Understand Functions:
- Model-Specific Diagrams – Learn:
- Ensure you have the diagram the function of each part and how they interact with each corresponding to the exact model of the excavator you are other within the system.
working with.
- Source:
Step – Obtain diagrams from3: Use the Diagram for Maintenance Planning** - reliable sources such as manufacturer manuals, dealership service departments, or authorized websites. Create a Maintenance Schedule:
Step 2: Familiarize Yourself with – Use the diagram to identify parts that require regular inspections, such the Diagram
- Review as hydraulic hoses, filters, the Layout:
- Examine the overall structure of the excavator as depicted and pivot points.
- Checklists: in the diagram.
- Identify Components:
- Develop maintenance checklists based on the components shown in the diagram to ensure thorough inspections.
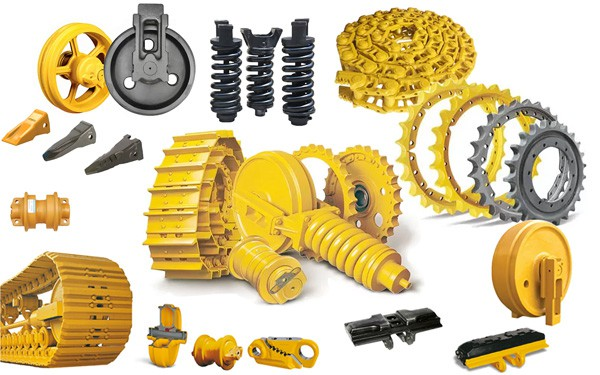
- Take note of major components such as:
- Boom
- Stick
Step 4: Implement Troubleshooting Techniques
- – Bucket
- Hydraulic System
- Tracks
Identify Issues:
- When a problem arises, refer – Cab
Step 3: Use to the diagram to locate the affected components the Diagram for Maintenance
- Scheduled Maintenance:
- Refer to quickly.
- Trace Systems:
- Use the diagram to trace the diagram to create a maintenance checklist based on key hydraulic or electrical systems to identify potential components that need regular attention.
- ** points of failure or damage.
Step 5:Inspection Procedures:
- Use the diagram to guide inspections, ensuring Conduct Repairs and Replacements**
- ** that all parts are checked forLocate Parts**:
- Use wear, damage, or leaks.
- Replacement the diagram to find the exact location of parts needing Parts:
- Identify parts that repair or replacement.
- Follow Procedures may need replacement and cross-reference:
- Adhere to with part numbers for ordering.
Step manufacturer guidelines and protocols for removing and4: Apply the Diagram for Troubleshooting replacing components as indicated in the diagram.
Step 6: Enhance Operator
- Identify Symptoms:
- When issues arise Training**
- Training Sessions:, note the symptoms and refer to the diagram to
- Use the diagram in training sessions to educate new operators about the machine’s identify potentially affected components.
- Systematic Diagnosis:
- Follow the layout and component functions.
- Hands-On Learning:
flow of systems (e.g., hydraulic – Encourage operators to refer to the diagram while working on the or electrical) as shown in the diagram to isolate the problem. - Document Findings machine to reinforce their understanding.
Step :
- Keep a record of identified issues and the steps taken to7: Optimize Performance**
- Analyze Component Performance:
- Refer to the diagram to resolve them for future reference.
Step 5: Utilize for Operator evaluate the performance of individual components and identify areas for enhancement.
Training**
- Training Sessions:
- Use the diagram in training sessions- Attachment Compatibility:
- Use to educate new operators on the components and their the diagram to determine which attachments are best suited for specific tasks, maximizing the functions.
- Hands-On Learning:
- Conduct hands-on training by having operators refer to the excavator’s efficiency.
Step 8 diagram while working on the machine to reinforce learning.
: Maintain Safety Standards**
- Identify Safety Features:
- Safety Protocols:
- Highlight safety – Use the diagram to locate emergency shut-off features and emergency shutdown mechanisms on the diagram during training to enhance safety switches and safety features to ensure operators are familiar with them.
awareness.
Step 6: Integrate into Operational Procedures
- **Operational Check- *Promote Safe Practices*:
- Train operators on safe handling of components,lists**:
- Develop daily operational checklists based on the components identified in using the diagram to illustrate potential hazards.
Step 9: the diagram to ensure proper functioning.
- Performance Monitoring:
Document Changes and Updates** - Keep Records:
- Document any – Monitor the performance of specific parts using the diagram to assess their effectiveness changes made to components or systems based on insights from in operations.
- Feedback Loop:
- Encourage operators the diagram.
- Update Diagrams: to provide feedback on parts performance and usability
- If modifications are made to the excavator, update the parts diagram, which can be referenced against the diagram for improvements.
Step accordingly to maintain accuracy.
Conclusion
By 7: Review and Update following this step-by-step guide, you can effectively apply an excavator**
- Regular Updates:
- As new parts parts diagram in various situations, from maintenance or modifications are made to the excavator, and troubleshooting to training and performance optimization. Utilizing these ensure the diagram is updated to reflect these changes.
diagrams will lead to improved efficiency,- Continual Learning:
safety, and longevity of your excavator. If you – Regularly revisit the diagram to reinforce knowledge and have any further questions or need additional assistance, feel free to ask! stay informed about the latest maintenance and operational practices.