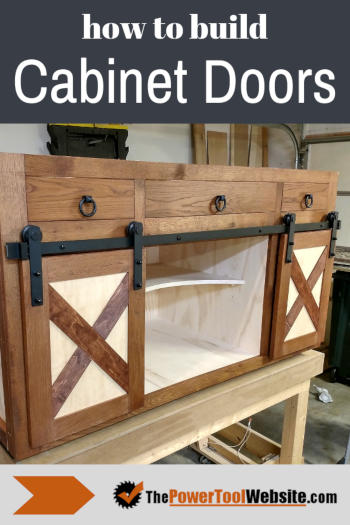
How To Build Cabinet Doors – The Power Tool Website
Depending on the type of cabinet you’re building, this process will vary some. But the basics are the same, you need a frame, that fits around a panel, which can be plain, raised, or decorated somehow. For this tutorial on how to build cabinet doors, I’ll be making a tongue and groove, framed x-style sliding door.
And don’t worry about the hardware. Whether you’re using standard hinges, concealed hinges, barn-door hardware, or just about anything else. The door is still made just the same.
I’ll dive into the details below, but first I want to share a general outline of building a cabinet door this way.
This will help you follow along easier with all the included steps and pictures to come.
How To Build Cabinet Doors – General Outline:
- Sketch up some plans to get your dimensions of the doors rails and stiles. From that you can also get dimensions of the panel. Keep in mind, either the rails or the stiles will have a 1/2″ tongue at each end, so account for that in your dimensions. I’ll be adding the tongue to the rails.
- Cut the rails and stiles to length and width. You should wait to cut the panel to size until after you can dry-fit the frame together. This is helpful just so you can confirm your measurements before fitting the panel. There will be a small gap around the panel in the groove (it shouldn’t fit tight). We’ll cover that later.
- Cut 1/2″ tongues at each end of each rail. These should be at least as thick as your panel will be. I’m using 1/4″ plywood, so my tongues are just heavy of 1/4″ thick. Leave some excess on the length of the tongues to make sure they will fit your final grooves.
- Cut 1/2″ deep grooves along the inside edges of each rail and each stile. These should be centered and just wide enough for the tongues to fit inside. Sneak up on a final width of a groove to keep from making them too big. Trim off the excess from the tongues so they sit all the way into the groove.
- Measure up the final dimensions for your panel, leaving 1/8″ to 1/4″ gap around the perimeter. When it fits inside the frame, it should be able to slide in either direction. This is a ‘floating panel’, and is designed this way to account for expansion and contraction in the frame. Dry fit the entire assembly and make sure everything fits together nice and square. Disassemble and fix any flaws at this time.
- Apply glue just on the tongues and the matching section of the grooves. Do not glue in a way that would glue the panel in place. Clamp the entire door together as you did during the dry fit. Only clamp tight enough to close the gaps at the tongue and groove joints. Much pressure beyond that can ruin the door.
- Create the X-Style door with some scrap plywood by setting it in place, and then transferring the angles to your miter saw or miter gauge. No complicated math or geometry needed. Glue these strips directly on to the panel.
And there’s the entire process in a nutshell. Now, let’s move on to the nitty gritty details of how to build a cabinet door.
Step 1 – Make Your Plans
The first part in how to build a cabinet door is to get a rough sketch made so you can determine the dimensions of each piece needed.
The door will be made from 2 rails (the horizontal pieces), 2 stiles (the vertical pieces), and the panel.
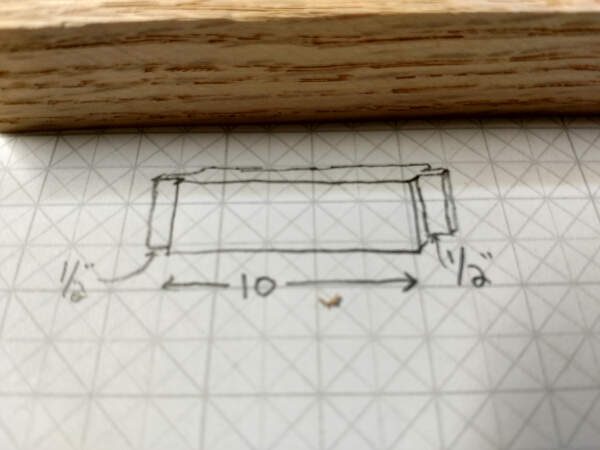
Your quick sketch does not need to be pretty, or to scale. Here’s mine:
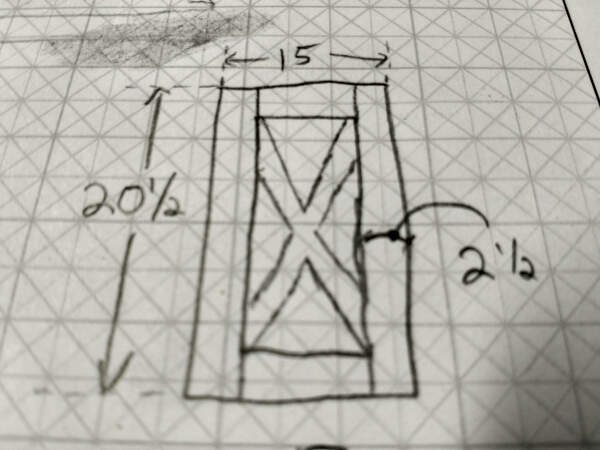
As you can see, with the total width of the door, minus the width of the stiles, I can determine the length of the rails; 10″.
Then I add a 1/2″ tongue at both ends, so I end up with 11″ rails before the tongues are made. I would also suggesting adding yet another 1/2″ to the length, so you can make the tongues a bit longer than they need to be.
That way you can trim them back and sneak up on a better fitting tongue and groove joint. That makes the dimensions of the rails initially to be 11-1/2″. Here’s the sketch for once the excess from the tongues are cut off:
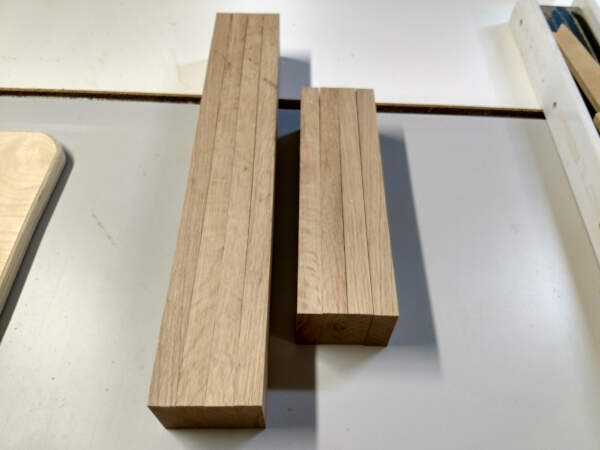
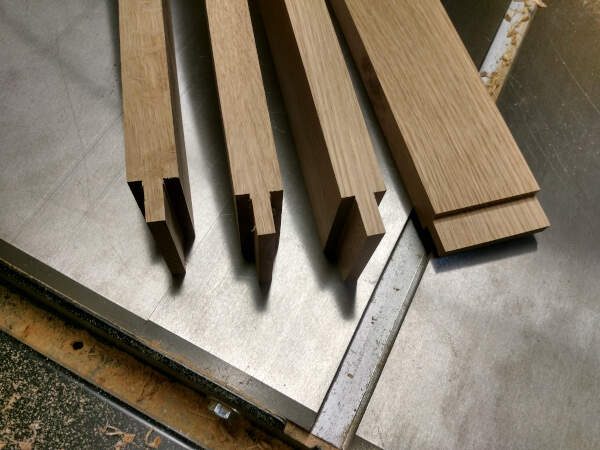
Step 2 – Cut Pieces to Initial Dimensions
First, rip all pieces down so they’re about 1/8″ wider than they need to be.
Then fine tune the width and make sure each edge has a clean cut in the process.
Then using a stop block, cut the pieces to their final lengths as determined in step 1.
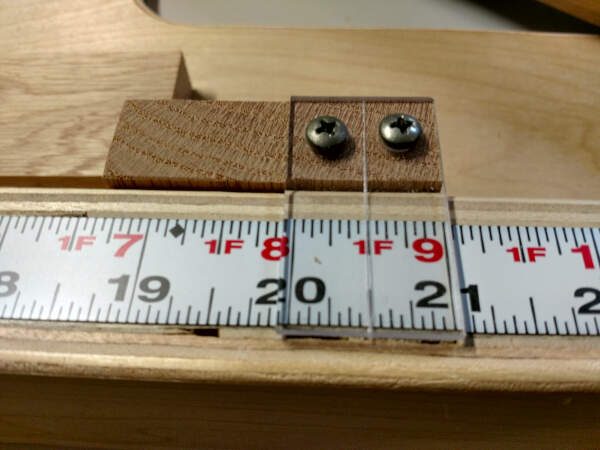
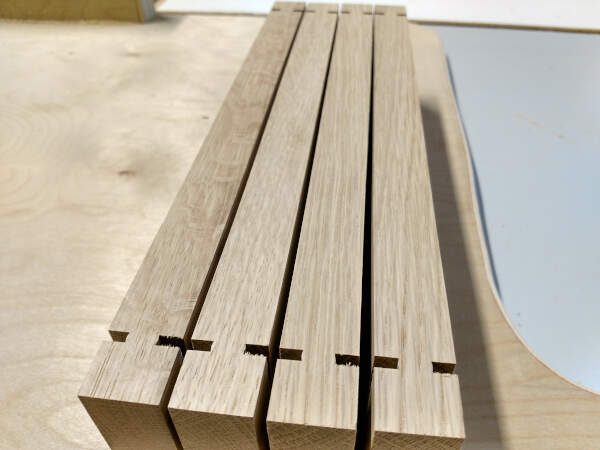
Here’s all my rails and stiles for a total of 2 doors.
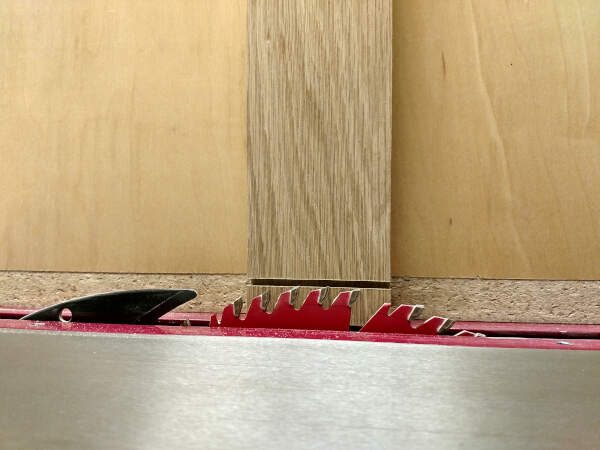
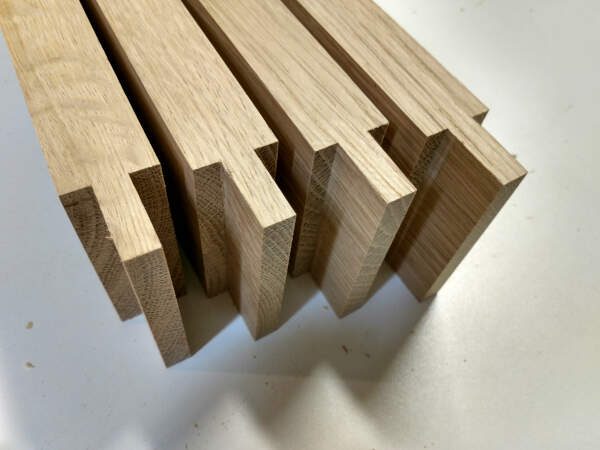
Step 3 – Cut the Tongues
How to build cabinet doors with simple tongue and groove joinery – here’s how you cut the tongues.
Special Note – Before I get into this step, be aware that you can swap steps 3 and 4. Sometimes I cut the tongues first, and then size the grooves to fit. I’ve also cut the grooves first, then size the tongues to fit.
As my sketch from above clearly showed, the main section of each rail should be 10″, the rest of the length is tongue.
So once the tongues are marked, just make sure you end up with 10″ of rail between them. That means initially the tongues won’t be just 1/2″ (remember, we added some length to help make a tight joint).
My rails should then have 3/4″ tongues at this stage, so I start by making marks at one end, lining up the board to the blade, and setting up my stop block.
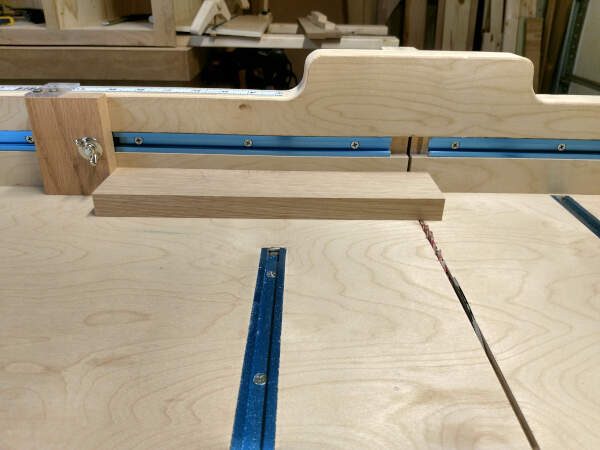
To get plans for this exact table saw sled, including attachments, go to Wood Shop Essentials.
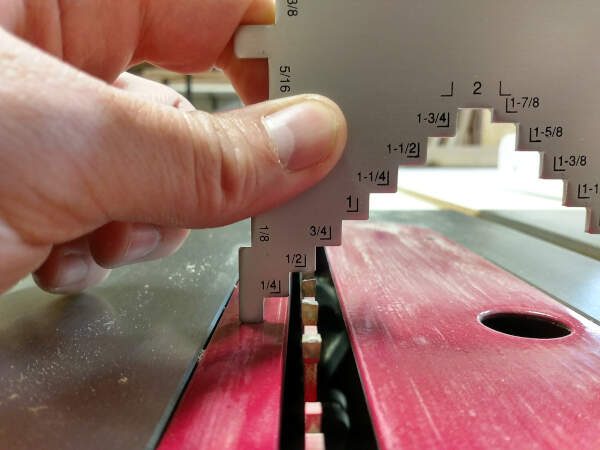
The tongues should be just a bit thicker than the panel, which is 1/4″ in my case. I’ll raise the blade to slightly less than 1/4″.
Now you can make the first cut for each side of each tongue without having to mark and line up every piece.
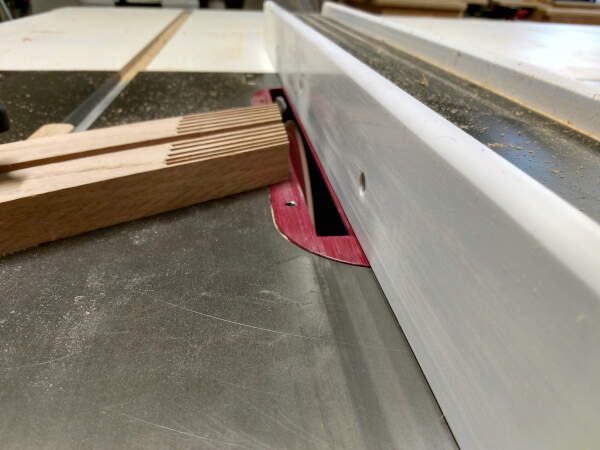
To finish the tongues with a nice clean cut, I suggest using a vertical cut auxiliary fence.
These are designed to safely support the board vertically, which is great for cutting tongues, notches, grooves, raised panels, etc… Here’s what mine looks like:
I have plans available for this vertical cut auxiliary fence, check out Wood Shop Essentials.
Now set the blade height so it will just reach into the groove you cut at the shoulders of the tongues..
Line the vertical cut fence up so you’ll be trimming away less than 1/8″, that way you don’t drop a small strip of wood down in beside the blade.
Cut away at both sides, at each end, and on all boards, before adjusting the fence in a bit closer.
Do this until you sneak up on a tongue that is your final thickness, which should be just a bit more than the thickness of your panel. My tongues are just over 1/4″ thick, because I’m using 1/4″ plywood.
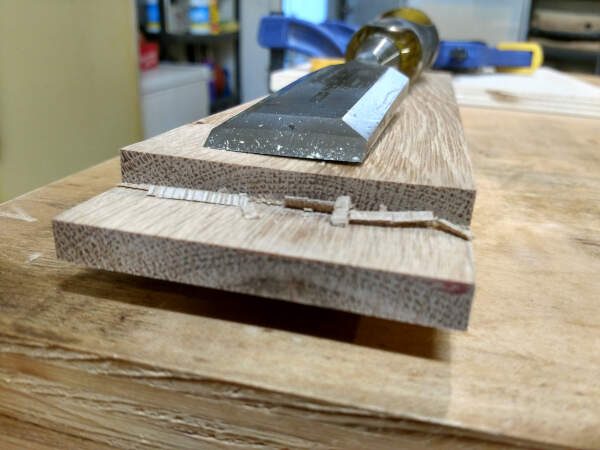
If needed, clean up the inside corners of the tongues with a chisel.
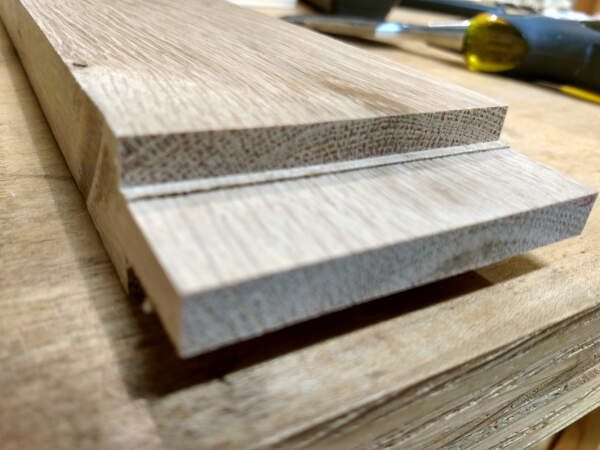
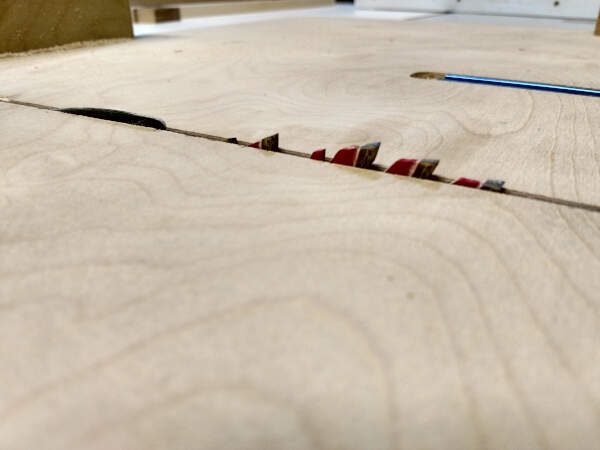
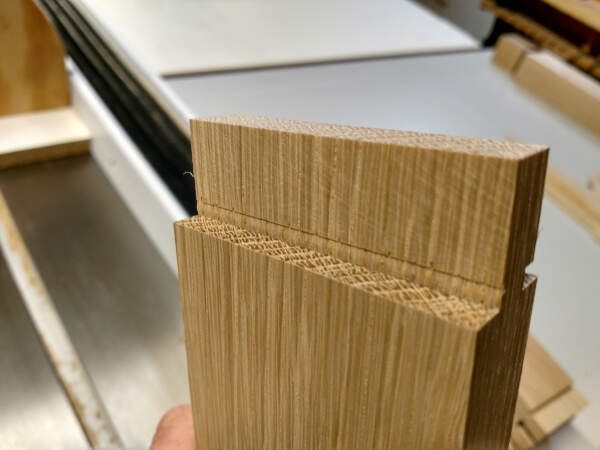
Step 4 – Cut The Grooves
How to build cabinet doors – the frame requires grooves along the inside edges to fit the panel. Here’s how you cut the grooves.
The grooves are to be cut along one edge of every rail and stile. It should be just wide enough so the tongue fits snug inside.
You’ll use your regular rip fence for this, and set your blade height to 1/2″.
Line your fence up so the blade runs as close to center of the board as possible.
Using a feather board for this part is a good idea, but not required.
(For this type of cut, you can position the feather board so it’s right in line with the blade.)
Now run each board through the cut, rotating them so each face runs against the fence at each fence-position.
This centers the groove.
Make very slight adjustments to your fence at each step, being sure to cut both walls of all grooves at each fence-position.
Test the fit along the way, and only make the grooves wide enough so the tongues fit snug.


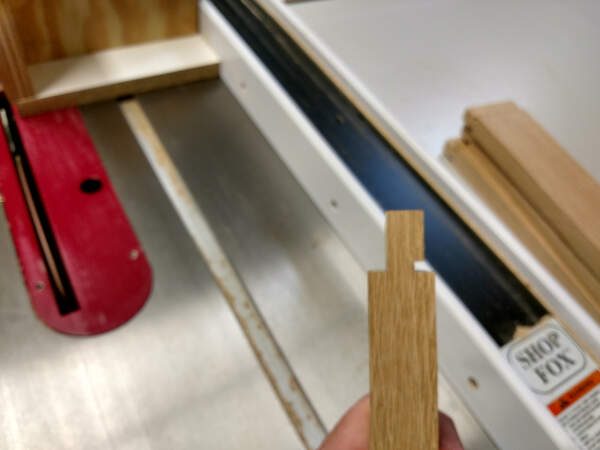
Now I need to remove just enough of the tongue so it’s only long enough for the groove.
To help line up this final cross cut on the tongue, use a piece of scrap wood as a depth gauge of the groove.

Scribe a line across the scrap piece, and use it to line up your tongue:

You can use a stop block to help line up one cut from each rail. But once that’s cut off, you’ll need to use the gauge again to line up the other side, and reposition the stop block.

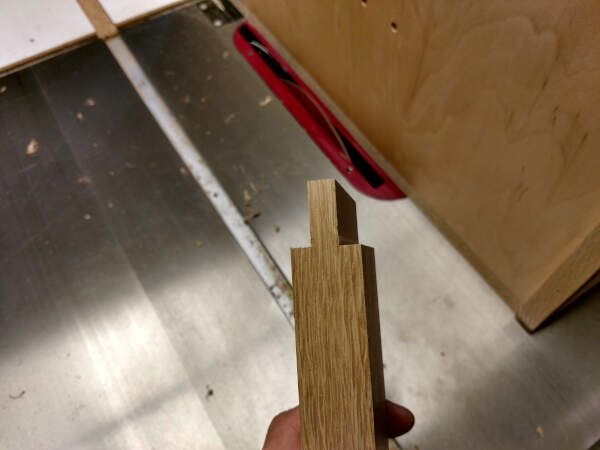
Step 5 – Dry Fit and Add The Panel
How to build a cabinet door – dry fit your framed door before gluing and clamping.
You can dry fit just the frame at this point, to make sure all the tongues fit correctly in their matching grooves.


Now to get the width of the panel, measure the entire length of the rail (or the stile if that’s what has the tongue). Then subtract 1/8″ to 1/4″.

You can also remove 1 stile and measure between the tongues of the rails. Then subtract 1/8″ to 1/4″ and there’s your other dimension for the panel.


Now, before we move to step 6, if you want contrasting finishes, then you should take care of that now.
I’m staining my frame dark, and leaving the panel light. So I’ll stain the rails and stiles now and do the glue up the following day after the stain has time to dry.
This also means I have to do my sanding now before I stain. That means I won’t be able to sand down the glued joints, so I must manage my glue squeeze out more diligently.
If you’re not applying a stain prior to glue up, then you can sand down the frame after it’s glued together, and squeeze out is not as big of an issue. We’ll get into that next.
Step 6 – Glue Up
How to build cabinet doors – finishing up with a simple 2-clamp glue-up process, gluing all 4 joints of the door at the same time.
This is not complicated, but like with any glue up, it can be stressful.
The idea is to keep the glue only where the tongues are going into the grooves. The plywood panel should not be glued into the grooves.
The panel is floating, that means it should be free to shift around within the grooves if there is ever any expansion or contraction of the rails and stiles.
So apply glue to the tongues, and some in the grooves where the tongues will fit in.
Fit 3 pieces together, slide in the panel, then fit the 4th piece.
Clamp the entire assembly with 2 clamps, applying just enough pressure to close the gaps.

Because I can’t sand again, I went light on the glue, and I wiped away the little bit of squeeze out I had with a damp rag. That’s why you don’t see any glue squeeze out here.

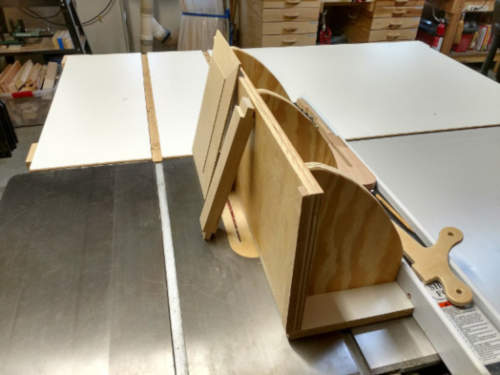
Step 7 – X Style Doors
How to build cabinet doors with the X style finish.
The rustic look I’m going for on this project requires a little more than basic, flat, framed panel doors. So I’m adding the X style using a very simple process.
I’m using the remaining 1/4″ plywood I have from the panels, and I will cut them at the required angles to create the X look. Then I’ll glue them to the plywood panels.
This does not require complicated math, trig, or geometry of any kind. Just a simple method which I call “Eye-Balling-It”.
First, cut the plywood into 2″ wide strips.
Lay a piece across the door from corner to corner, lining up the opposite sides at opposite corners:

Then using some kind of a protractor, angle finder, or t-bevel, get the angle of the piece, compared to the stile.

Use that to set up your miter saw, or you miter gauge on the table saw.

Now cut one end, place it back on the door, and mark the other end.


Cut it short enough so there’s a little bit of a gap to allow the panel some movement.

After it’s cut, use it as a template to mark and cut the other piece, so you have 2 idential pieces. One will be flipped over to fit the door.
Lay both pieces on the door, and mark the underneath piece where the top piece crosses it.


Now line up your mark on your table saw with the miter slot, and adjust your miter gauge against the board:


And just like that, you’ve now figured out your other angle, and you didn’t have to do any complicated math!
Now just cut away this middle section and you’ll have the pieces ready for the X.


Apply any stain you want now, especially if it’s going to contrast the panel like mine is.

While the stain was drying, I went ahead and attached barn-door hardware:

Then once the stain is dry, glue the pieces to the panel. For this, you can’t really use clamps, so use bolts, screws, glue, stain, paint, and anything else that has some weight to it.

Let it sit a half hour or so.

And that’s it – how to make cabinet doors. These are now ready for a protective finish. I’ll be doing a wipe on poly once I get further along in the project.
Here are the other articles in this tutorial series on my Kitchen Island Project:
- How to Build Base Cabinets For A Kitchen Island
- How to Build Shelves For A Kitchen Island
- How to Build Dovetail Drawers
- Kitchen Island Trim For A Rustic Island
- How to Build Cabinet Doors (you are here)
Be sure to sign up below to get updates on this project, free templates, plans, etc., directly to your inbox.